
Haematology Analyser Installation: A Buyer’s Checklist from Site Preparation to Sign-Off
Most installation delays come from the room, not the analyser: no dedicated socket, no space behind it, no plan for the waste. What to prepare before delivery, what to check on the day, and the records to have in hand before the first patient result.
Get the site requirements in writing before you order
Every analyser’s instructions for use set out its installation requirements, and the installer should send you a pre-installation checklist before delivery. The written quotation states who installs, calibrates and trains. As an example of what the instructions contain, Sysmex’s XN-L general information asks for an ambient temperature of 15–35 °C and 20–85% relative humidity, with air-conditioning if the room falls outside that; an earthed, dedicated power outlet within reach of its 2-metre cable; a bench or floor that can take the weight (about 35 kg for the XN-330); and at least 30 cm clear behind the analyser. A compact 3-part analyser is far smaller — Mindray describes the BC-30s footprint as similar to a 17-inch laptop — but the same questions apply.
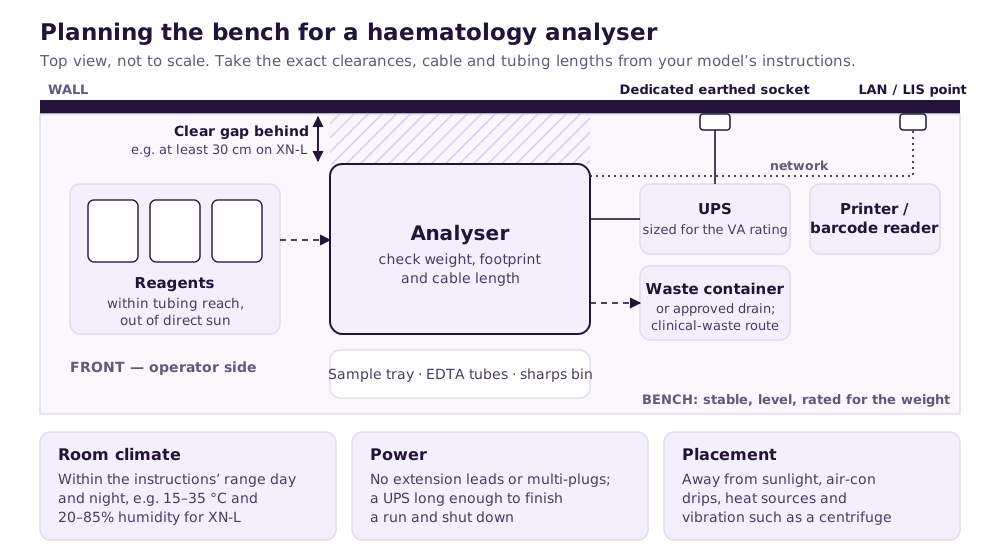
Site preparation checklist
| Item | What to prepare | Why it matters |
|---|---|---|
| Bench | Stable, level, rated for the analyser’s weight; away from direct sun, heat sources and vibration | Movement and heat upset counting and the optics |
| Clearance | The gap the instructions specify behind and beside the analyser | Ventilation, tubing and the engineer’s access for service |
| Power | An earthed, dedicated socket within cable reach; no extension leads or multi-plugs | Shared or poorly earthed circuits cause errors and are a safety risk |
| UPS | Sized for the analyser’s rating (the XN-330 lists 235 VA) and long enough to finish a run and shut down | A power cut mid-run can lose results and leave reagent in the lines |
| Room climate | Within the instructions’ range day and night, including weekends when air-conditioning may be off | Out-of-range temperature affects both the analyser and its reagents |
| Reagents | Shelf space beside or below the analyser within tubing reach, plus storage for stock at the labelled temperature | Tubing length is fixed; stock must stay within its storage range |
| Waste | A waste container or approved drain for the analyser’s liquid waste, handled under your clinical-waste arrangements | Liquid waste is potentially infectious and must not overflow onto the bench |
| Network | A LAN point or agreed connection for the LIS, and space for a barcode reader and printer | Results should reach the patient record without retyping |
Read next Setting up a clinic laboratory corner
On installation day
- Inspect the packaging on arrival and report any damage to the supplier before installation starts.
- Check that the serial number and model match the quotation and the MDA registration.
- The installer connects reagents and waste, runs the start-up self-checks and confirms the background count passes.
- Calibration is performed, or the factory calibration confirmed, with the calibrator lot recorded.
- Controls are run at every level and are within range before anything else.
- If you connect to an LIS, send test results through and check patient ID, units, flags and reference ranges in the clinic system.
- Each operator is trained on start-up, shutdown, daily and weekly maintenance, QC, error messages and sample handling — and signs a training record.
Read next Connecting the analyser to your LIS
Acceptance and verification before the first patient
The WHO laboratory quality handbook says equipment should not be used until it is fully installed, its performance is verified and the staff testing on it are trained. The Department of Standards Malaysia’s criteria for accredited medical laboratories (SC 2) ask for commissioning records for a testing analyser before it is placed into use, and user acceptance testing for LIS links and software.
- Precision: repeated runs of the same samples agree within the maker’s claims.
- Comparison: your patient samples agree with the method or reference laboratory you used before.
- Carryover: a high sample does not contaminate the next one.
- Sample modes: each mode you will use — venous whole blood, pre-diluted capillary — is checked separately.
- Sign-off: the person responsible for the laboratory accepts the analyser in writing before patient results are released.
Read next Verification studies step by step
Documents to receive and keep
- The installation or commissioning report, signed and dated.
- The calibration report and the first QC printouts.
- Training records for every operator.
- MDA registration numbers for the analyser and each reagent, control and calibrator, and a copy of the supplier’s establishment licence.
- The warranty start date, the preventive-maintenance schedule and the service contact for your state.
- The instructions for use, quick-reference guides and safety data sheets for the reagents.
- Your verification plan, data and sign-off.
Read next What a service contract should coverChecking MDA registrations
Moving or reinstalling later
Treat a move like a small installation. Ask the supplier whether the engineer must do it, check the new bench, power and climate against the same list, and run controls before patients. Recalibrate if the maker requires it after relocation, and repeat a reduced verification as your quality procedures specify.
Read next When to recalibrate
Related guides
Hematology Analyser supply near you
Written quotes for clinics across Malaysia, handled from Batu Caves, Kota Kinabalu and Kuching.
- Hematology Analyser Kuala LumpurKuala Lumpur
- Hematology Analyser SelangorSelangor
- Hematology Analyser Petaling JayaSelangor
- Hematology Analyser Shah AlamSelangor
- Hematology Analyser KlangSelangor
- Hematology Analyser SerembanNegeri Sembilan
- Hematology Analyser MelakaMelaka
- Hematology Analyser Johor BahruJohor
Sources and further reading
- Sysmex. XN-L series XN-530/XN-430/XN-330 General Information (installation environment, space and electrical requirements)
- Mindray. BC-30s auto hematology analyzer (manufacturer page)
- World Health Organization. Laboratory quality management system handbook (2011), chapter 3: Equipment
- Department of Standards Malaysia. SC 2: Specific criteria for accreditation in the field of medical testing, Issue 6 (25 July 2024)
- Medical Device Authority. Malaysia Medical Device Register: registered devices and licensed establishments
Frequently asked questions
How much space does a haematology analyser need?
Do I need a UPS for an FBC machine?
What room temperature does a haematology analyser need?
Who installs the analyser?
When can we start testing patients?
Can we move the analyser ourselves?
Get a written quotation
Tell us your clinic or lab type, daily workload and location. We match suitable models and send a written quotation that states who handles delivery, installation and training, and what each costs.
010-905 2891 · Mon–Sat, 9:00 am – 6:00 pm